
Hardware virtualization is a powerful feature that allows a single physical machine to host multiple virtual environments, each functioning as an independent system. It’s essential for running virtual machines, optimizing resource utilization, and enhancing security. In this guide, we’ll explain hardware virtualization, its benefits, and how to enable it step by step, while filling any gaps commonly found in similar articles.
What is Hardware Virtualization?
Hardware virtualization is the process of creating virtual versions of physical hardware components to run multiple operating systems or applications on a single machine. This is made possible through a software layer called a hypervisor, which acts as a bridge between the hardware and virtual machines.
Key Terms:
- Hardware Virtualization: A technology that allows a physical CPU to act as multiple virtual CPUs.
- Hypervisor: Software or firmware that creates and manages virtual machines.
- Type 1 Hypervisor: Runs directly on the host’s hardware (e.g., VMware ESXi, Microsoft Hyper-V).
- Type 2 Hypervisor: Runs on a host operating system (e.g., VMware Workstation, VirtualBox).
Benefits of Hardware Virtualization
- Cost Efficiency: Reduces hardware needs by hosting multiple environments on a single system.
- Flexibility: Quickly deploy and manage virtual machines.
- Improved Disaster Recovery: Allows snapshots and easy restoration of virtual machines.
- Enhanced Security: Isolates environments, reducing the risk of cross-infection from malware.
- Efficient Resource Usage: Maximizes CPU and memory utilization.
Steps to Enable Hardware Virtualization
To use hardware virtualization, it must first be activated in your system’s BIOS or UEFI settings. Follow these detailed steps:
1. Check CPU Compatibility
- For Intel processors, ensure support for Intel VT-x.
- For AMD processors, ensure support for AMD-V.
- Use tools like Intel Processor Identification Utility or AMD System Monitor.
2. Access BIOS/UEFI Settings
- Restart your computer.
- Press the designated key during startup (e.g., F2, F10, Delete, Esc) to access the BIOS/UEFI menu.
3. Locate Virtualization Settings
- Navigate to Advanced or CPU Configuration.
- Look for options like:
- Intel Virtualization Technology (Intel VT-x)
- AMD Virtualization (AMD-V)
- SVM Mode (for AMD CPUs)
4. Enable Virtualization
- Select the virtualization option and change its value to “Enabled.”
- Save changes and exit the BIOS/UEFI menu.
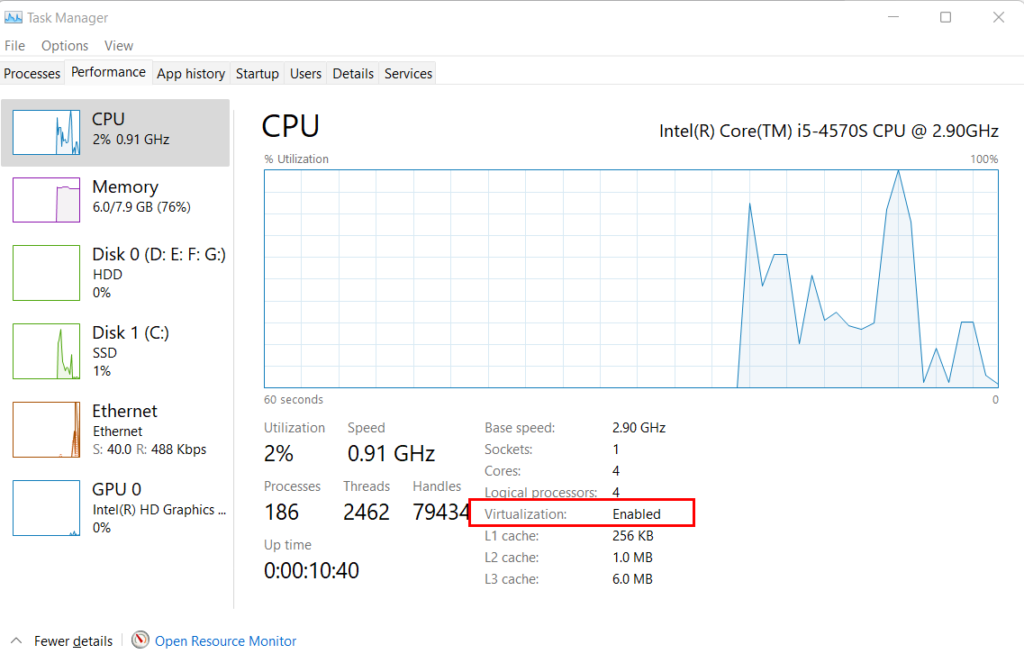
5. Verify Virtualization is Enabled
- For Windows:
- Open Task Manager (“Ctrl + Shift + Esc”).
- Go to the Performance tab and check under CPU for “Virtualization: Enabled.”
- For Linux:
- Run the command egrep -o ‘(vmx|svm)’ /proc/cpuinfo in the terminal.
Manufacturer-Specific Guides
Here are direct links to guides for enabling virtualization based on your device’s manufacturer:
| Manufacturer | Support Link |
| Acer | Acer Support |
| Asus | Asus Support |
| Dell | Dell Support |
| HP | HP Support |
| Lenovo | Lenovo Support |
Common Issues and Troubleshooting
- Virtualization Option Missing:
- Ensure your CPU supports virtualization.
- Update BIOS/UEFI firmware from the manufacturer’s website.
- Performance Issues:
- Ensure your system meets the minimum requirements for running virtual machines.
- Allocate sufficient memory and CPU cores to virtual machines.
- Error Messages:
- Disable Hyper-V in Windows if using third-party hypervisors.
- Check for conflicting security software that may disable virtualization.
CPU Virtualization Support Comparison
| Feature | Intel VT-x | AMD-V |
| Full System Emulation | Supported | Supported |
| Nested Virtualization | Supported (limited) | Supported |
| Software Compatibility | Broad (VMware, etc.) | Broad (KVM, etc.) |
| Hardware Support | Widely available | Widely available |
Conclusion
Enabling hardware virtualization is crucial for leveraging the full potential of modern computing environments. By following the steps outlined in this guide, you can activate this feature and enjoy benefits such as improved resource utilization, better security, and enhanced disaster recovery. Whether you’re a professional or a general user, ensuring virtualization is properly configured will maximize your system’s capabilities.