
Laptop screen damage is a common issue many users face, but repairing it is often more practical than buying a new laptop. This guide dives deep into the steps, tools, and considerations involved in repairing a laptop screen, helping you make an informed decision.
Understanding Laptop Screen Issues
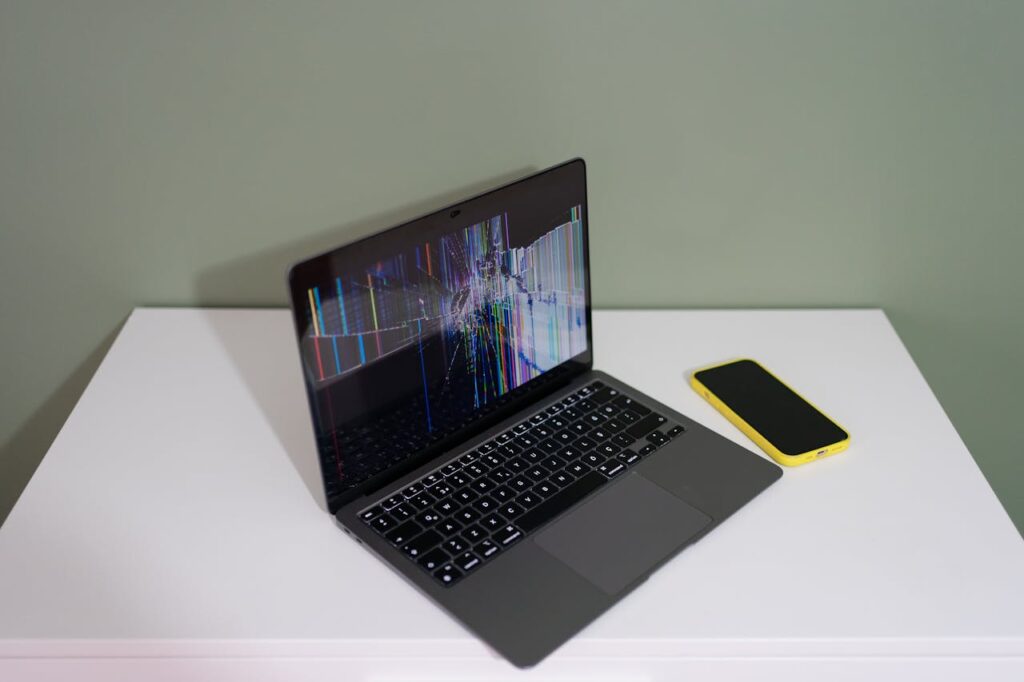
Laptop screen problems can manifest in various ways, from cracked displays to flickering or blank screens. Knowing the root cause of the issue is the first step toward repair.
Common Laptop Screen Issues:
- Physical Damage: Cracked or shattered screens due to impact.
- Display Artifacts: Lines, flickers, or distorted images on the screen.
- Backlight Problems: A dim or dark screen caused by a faulty backlight.
- Connection Issues: A loose or damaged cable between the screen and the motherboard.
Step 1: Diagnose the Problem
External Display Test
- Connect your laptop to an external monitor using an HDMI, VGA, or USB-C cable.
- If the external monitor works fine, the issue is likely with the laptop screen itself.
- If the external monitor also displays problems, the issue might be with the GPU or motherboard.
Visual Inspection
- Check for visible cracks or damaged areas on the screen.
- Look for signs of flickering, dead pixels, or lines that suggest internal screen damage.
Check the Display Settings
- Go to your laptop’s display settings to ensure proper configuration.
- Sometimes incorrect resolution settings can mimic screen issues.
Step 2: Prepare for Repair
Tools You’ll Need:
- Small screwdrivers (Phillips and flathead).
- Plastic pry tools or guitar picks.
- Antistatic wrist strap (optional but recommended).
- Replacement screen compatible with your laptop model.
Identify Your Laptop Model
Finding the right replacement screen requires knowing your exact laptop model.
- Check the Manufacturer’s Label: Found on the underside of the laptop or battery compartment.
- System Information:
- Windows: Press Windows key + R, type msinfo32, and look under “System Model.”
- Mac: Click the Apple logo and select “About This Mac” to view your model.
Step 3: Sourcing a Replacement Screen
Considerations When Buying:
- Size and Resolution: Match the exact specifications of your original screen.
- Connector Type: Ensure the replacement screen uses the same connector type (e.g., 30-pin or 40-pin).
- Retailers: Purchase from reputable retailers or directly from the manufacturer for guaranteed compatibility.
Cost of Replacement Screens
Here’s an example table to give you a rough idea of costs:
| Laptop Type | Screen Size | Estimated Cost (USD) |
| Budget Laptops | 15.6″ | $50–$100 |
| Mid-range Laptops | 13.3″ | $80–$150 |
| High-end Laptops (e.g., MacBook) | 15″ | $150–$300 |
Step 4: Replacing the Screen
Steps for Replacement
- Power Off and Disconnect: Shut down your laptop and unplug it from any power source. Remove the battery if possible.
- Remove the Bezel: Use a plastic pry tool to carefully detach the bezel around the screen. Be gentle to avoid snapping clips.
- Unscrew the Screen: Locate the screws securing the screen to the frame and remove them.
- Disconnect the Cable: Detach the ribbon cable connecting the screen to the motherboard.
- Install the New Screen: Connect the replacement screen’s cable, secure it with screws, and snap the bezel back into place.
- Test the Laptop: Power on the laptop to ensure the new screen functions correctly.

When to Seek Professional Help
While DIY repairs are cost-effective, certain scenarios warrant professional assistance:
- Severe Physical Damage: If multiple components around the screen are damaged.
- Complex Laptop Designs: High-end laptops like MacBooks may require specialized tools and expertise.
- Time Constraints: Professionals can save you the hassle of sourcing parts and performing delicate repairs.
Preventing Future Damage
To extend the life of your laptop screen:
- Use a protective case or sleeve during transport.
- Avoid placing heavy objects on the laptop lid.
- Clean the screen with a microfiber cloth and an appropriate cleaner.
Summary and Action Points
Repairing a laptop screen is entirely possible with the right tools, knowledge, and replacement parts. Follow this guide to assess the problem, prepare for repair, and complete the replacement process. If you’re unsure or the issue seems beyond your skills, consult a professional to ensure your laptop’s functionality is restored.
By investing time in understanding and repairing your laptop screen, you can save money and extend the life of your device while reducing electronic waste.